Archive for the 'Pastries' Category

Cinnamon Rolls

Whenever I get a craving for cinnamon rolls, this is my go-to recipe.  I’ve tried several cinnamon roll recipes over the years, and the Pioneer Woman’s recipe is by far my favorite.  This may surprise you, but they are actually really easy to make!  You don’t even need a mixer.  The dough for these rolls is so soft and fluffy and the filling is sweet, buttery and deliciously cinnamon flavored.  I always make two pans and freeze one of them (unglazed of course).  You can just re-warm them in the oven straight from the freezer and they taste (almost) as good as the totally fresh batch, even after being frozen for a month or two.  These cinnamon rolls are the perfect thing to make for a special brunch or a weekend breakfast.  I have even been known to make them for dessert.  Any time of day is a good time for cinnamon rolls.  :)  Enjoy!

Cinnamon Rolls

(print recipe)

Ingredients

For the Cinnamon Rolls:

  • 2 cups whole milk
  • ½ cup vegetable oil
  • ½ cup granulated sugar
  • 1 package (2 ¼ teaspoons) Active Dry Yeast
  • 4 cups (Plus ½ cup extra, separated) all-purpose flour
  • ½ teaspoon (heaping) baking powder
  • ½ teaspoon (scant) baking soda
  • ½ tablespoon (heaping) salt
  • Melted butter (approximately ½ cup = 1 stick)
  • ¾ cup granulated sugar (approximately… sometimes I only use ½ cup)
  • Generous sprinkling of cinnamon

For the Glaze:

  • 2 cups powdered sugar
  • 1 teaspoon maple syrup
  • 3-5 tablespoons milk

Directions

  1.  To make the cinnamon rolls: Mix the milk, vegetable oil, and sugar in a pan.  Scald the mixture (heat until just before the boiling point—approx. 170 degrees F).  Turn off the heat and leave to cool 45 minutes to an hour.  (The mixture should be cooled to approximately 110-120 degrees F).  When the mixture is lukewarm to warm, but NOT hot, sprinkle in the package of yeast.  Let this sit for a minute.  Then add 4 cups of all-purpose flour and stir the mixture together.  Cover and let rise for at least an hour.
  2. After rising for at least an hour, add ½ cup more of flour, the baking powder, baking soda, and salt.  Stir the mixture together.  (At this point you could cover the dough and put it in the fridge until you need it – overnight or even a day or 2, if necessary.  Just keep your eye on it and if it starts to overflow out of the pan, just punch it down.)
  3. When you are ready to prepare the rolls, sprinkle a rolling surface generously with flour.  Take the dough and form a rough rectangle.  Then roll the dough thin, maintaining a general rectangular shape.  Drizzle 1/3 to ½ cup of melted butter over the dough.  Sprinkle ½- ¾ cup of granulated sugar over the butter, followed by a generous sprinkling of cinnamon. 
  4. Starting at the end opposite you, begin rolling the dough in a neat line toward you.  Keep the roll relatively tight as you go.  Then pinch the seam of the roll to seal it. 
  5. Spread 1 tablespoon of melted butter in 2 round cake or pie pans, making sure to also butter the sides of each pan.  Then begin cutting the rolls approximately ¾-1 inch thick and laying them in the buttered pans.  (You should fill 2 pans).
  6. Let the rolls rise for 20-30 minutes.  Then bake them at 375 degrees Fahrenheit until light golden brown, about 18-22 minutes.
  7. To make the glaze:  In a small bowl, whisk together the powdered sugar, maple syrup, and milk until smooth.  (If the mixture is too thick, add a little more milk to thin it out.  If it is too thin, add a little more powdered sugar to thicken it).  The mixture should be thick but still pourable.  Generously drizzle the glaze over the warm cinnamon rolls.  (Note – if you are planning to freeze one of the pans of cinnamon rolls, do not glaze them at this time.  To reheat a frozen pan of rolls, just place it in a preheated oven at 350 degrees F until the cinnamon rolls are warmed through – this will probably take 10-15 minutes.  Then glaze them.)

Yield: approximately 16-18 cinnamon rolls (depending on size)

Source: Adapted from the Pioneer Woman

Monkey Bread

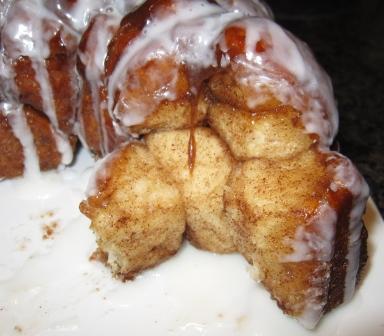
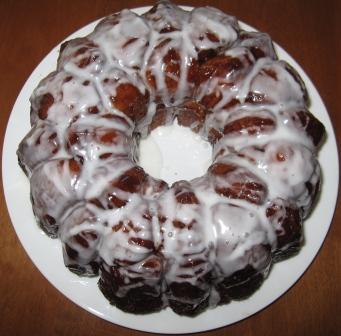
What do you get when you take fluffy balls of dough, dunk them in butter, coat them in cinnamon sugar, and bake them in a Bundt pan?  You get one of the yummiest breakfasts I’ve ever made.  This bread tastes like a cinnamon roll, only better, because it’s extra gooey, extra buttery, and extra delicious.  This bread was fun to assemble, and even more fun to eat.  A word of warning: I don’t recommend making this bread unless there are lots of people around to help you eat it.  I made it over the weekend for just Eric and me, and before I knew it, it was almost half gone.  (Oops!)  It is so addicting!  (It was definitely worth the extra miles I’m going to have to run to burn off all those calories :) ).

I think this monkey bread would be the perfect thing to serve at a special brunch or Holiday breakfast.  And if you do have leftovers, just re-warm them in the microwave for about 30 seconds and they will be soft and gooey again just like after coming out of the oven.  Enjoy!

Monkey Bread

Ingredients

Dough:

  • 4 tablespoons unsalted butter, divided, 2 tablespoons softened and 2 tablespoons melted
  • 1 cup milk, warm (about 110 degrees F)
  • 1/3 cup water, warm (about 110 degrees F)
  • ¼ cup granulated sugar
  • 1 package instant yeast
  • 3¼ cups all-purpose flour, plus extra for work surface
  • 2 teaspoons salt

Brown Sugar Coating:

  • 1 cup light brown sugar
  • 2 teaspoons ground cinnamon
  • 8 tablespoons unsalted butter (1 stick), melted

Glaze:

  • 1 cup confectioners’ sugar
  • 2 tablespoons milk

Directions

  1. Butter Bundt pan with 2 tablespoons softened butter. Set aside.
  2. In a large measuring cup, mix together milk, water, melted butter, sugar and yeast. Mix flour and salt in standing mixer fitted with dough hook. Turn machine to low and slowly add milk mixture. After dough comes together, increase speed to medium and mix until dough is shiny and smooth, 6 to 7 minutes. Turn dough onto lightly floured counter and knead briefly to form smooth, round ball. Coat large bowl with nonstick cooking spray. Place dough in bowl and coat surface of dough with cooking spray. Cover bowl with plastic wrap and place in a draft-free area until dough doubles in size, 50 to 60 minutes.
  3. For the sugar coating: While the dough is rising, mix brown sugar and cinnamon together in a bowl. Place melted butter in second bowl. Set aside.
  4. To form the bread: Gently remove the dough from the bowl, and pat into a rough 8-inch square. Using a bench scraper or knife, cut dough into 64 pieces.
  5. Roll each dough piece into a ball. Working one at a time, dip the balls into the melted butter, allowing excess butter to drip back into the bowl. Roll in the brown sugar mixture, then layer balls in the Bundt pan, staggering seams where dough balls meet as you build layers.
  6. Cover the Bundt pan tightly with plastic wrap and place in draft-free area until dough balls are puffy and have risen 1 to 2 inches from top of pan, 50 to 70 minutes.
  7. Preheat oven to 350 degrees F. Unwrap the pan and bake until the top is deep brown and caramel begins to bubble around the edges, 30 to 35 minutes. Cool in the pan for 5 minutes, then turn out onto a platter and allow to cool slightly, about 10 minutes.
  8. For the glaze: While the bread cools, whisk the confectioners’ sugar and milk in a small bowl until the lumps are gone. Using a whisk, drizzle the glaze over the monkey bread, letting it run over top and down the sides of the bread. Serve warm.

Note: To make without a stand mixer: In step 2, mix the flour and salt in a large bowl. Make a well in the flour, then add the milk mixture to the well.  Using a wooden spoon, stir the dough until it becomes shaggy and is difficult to stir. Turn out the dough onto a lightly floured work surface and begin to knead, incorporating the shaggy scraps back into the dough. Knead until dough is smooth and satiny, about 10 minutes.  Shape into a taut ball and proceed as directed.

Yield: 1 loaf, serves 6 to 8

Source: Brown Eyed Baker Blog; Originally from Cook’s Illustrated

Tomato, Mozzarella, & Basil Tart

Tomato, Mozzarella, & Basil Tart


If you are looking for an alternative to margherita pizza, this recipe is for you.   It has the same yummy toppings that you would find on a margherita pizza, but instead of a pizza, it’s a tart.  The crust consists of standard tart dough, with the addition of fresh minced basil and garlic mixed into it.  This gives the crust lots of flavor, making it extra delicious.  The toppings for the tart are simple- a little bit of tomato sauce, fresh mozzarella cheese, cherry tomatoes, basil, and parmesan cheese (as well as a sprinkle of salt, pepper, & extra virgin olive oil for extra flavor).

One thing that’s nice about this tart is that you can make the tart dough ahead of time, roll it out, and assemble it in the tart pan.  Then you just wrap the prepared tart in plastic wrap and refrigerate it if you plan to use it that day, or freeze it if you are saving it for another day.  When you are ready to cook the tart, just pop it in the oven, and blind bake the crust, add the toppings, and then finish baking it.

When I most recently made this tart for Mother’s Day, I served slices of it as a side dish, but it can be a main course too (a salad or veggies would go well with it).  This tart would also make for an impressive appetizer.  Enjoy!

Tomato, Mozzarella, & Basil Tart with Basil Garlic Crust

(print recipe)

Ingredients

For the dough:

  • 1/3 cup fresh basil leaves
  • 1-2 cloves garlic
  • 1¼ cups all-purpose flour
  • ½ tsp. kosher salt
  • 8 tbsp. unsalted butter (1 stick), chilled and cut into 8-10 pieces
  • 4-5 tbsp. ice cold water

For the filling:

  • 8 oz. mozzarella cheese, grated or sliced
  • Ripe cherry tomatoes
  • Salt and pepper
  • 1 tbsp. extra-virgin olive oil
  • Freshly grated Parmesan cheese
  • 1-2 tbsp. minced fresh basil
  • ¼ cup tomato-basil marinara sauce (optional)

Directions

  1. To make the dough, combine the basil and garlic in the bowl of a food processor.  Process, scraping down the sides of the bowl as needed, until finely minced.  Add the flour and salt; pulse briefly to combine.  Add in the chunks of butter and pulse about 10 times, or until the mixture resembles pea-sized crumbs.  Add 3 tablespoons of the water and pulse a few times to incorporate.  Add 1 more tablespoon and process for several seconds to see if the dough forms a ball.  If not, add the remaining tablespoon of water and process until a ball of dough forms.  Remove the dough, flatten into a 5-inch disc, and wrap in plastic wrap.  Refrigerate for at least 1 hour.
  2. 2. When you are ready to bake the tart, preheat the oven to 425° F.  Transfer the chilled dough to a lightly floured work surface and roll out into a 12-inch circle.  Lay the dough over a 9-inch round tart pan and press it into the sides.  Trim the excess dough as needed.  (I use this to reinforce the edges.)  Lay a piece of aluminum foil or parchment paper loosely over the tart dough and fill the center with baking beads (pie weights).  Bake in the preheated oven for 10-12 minutes.  Remove from the oven and carefully remove the foil or parchment and baking beads.  Return the empty tart shell to the oven to bake for 5 minutes more (crust should be lightly browned).  Remove from the oven and lower the heat to 375° F.  Note: If tart dough has puffed up during baking, prick it with a fork a few times.
  3. Spread a very thin layer of marinara sauce on the tart (The marinara sauce is optional- I like the extra flavor it provides, but since you only need a little sauce, I would only add it if you already have an open jar of leftover sauce in your fridge).
  4. Then layer the bottom of the pre-baked tart shell with the mozzarella.  Arrange the cherry tomato slices on top of the cheese in a single even layer.  Season with salt and pepper.  Drizzle with olive oil.  Top with freshly grated Parmesan and half of the minced fresh basil.
  5. Bake about 30 minutes, or until the dough is golden brown and the cheese is bubbly and lightly browned in places.  About halfway through baking, rotate the tart 180° and wick off any excess moisture that has collected on top with a towel if necessary.  Once you have removed the tart from the oven, sprinkle the remaining basil onto it.  Allow the tart to rest at least 5 minutes before slicing and serving.

Recipe adapted from: Annie’s Eats Blog; Originally from Pink Parsley, Ezra Pound Cake and The Complete Italian Vegetarian Cookbook


Enter your email address to subscribe to this blog and receive notifications of new posts by email.

Join 75 other subscribers