Archive for the 'Dessert' Category

Apple Pie

I made this pie a few days ago using my favorite apple pie recipe.  I’ve made this recipe several times before, but it was even more fun making it this time because I had two little helpers in the kitchen with me.  My twins are now 6 months old, and they had so much fun sitting in their high chairs watching me chop the apples and prepare the filling.

The method for making this pie is a little unusual because you pre-cook the apple filling in a Dutch oven before baking it.  There is nothing better than the smell of apples, cinnamon, and sugar simmering away on the stove!  This pie is delicious served warm with some vanilla ice cream, or you can eat it cold for breakfast like we sometimes do. :)   Enjoy!

Apple Pie

(print recipe)

Ingredients

For the dough:

  • 2 ½ cups all-purpose flour
  • 1 tsp. salt
  • 2 tsp. granulated sugar
  • 16 Tbs. (2 sticks) cold unsalted butter, cut into 1/2-inch dice
  • 3 to 4 Tbs. ice water

For the filling:

  • 2 lb. Granny Smith apples, peeled, cored and cut into slices ¼ inch
    thick
  • 2 lb. Pink Lady apples, peeled, cored and cut into slices ¼ inch thick
  • ½ cup firmly packed light brown sugar
  • ¼ cup granulated sugar
  • ½ tsp. ground cinnamon
  • ¼ tsp. salt
  • ¼ tsp. freshly grated nutmeg
  • 4 tsp. cornstarch
  • 1 Tbs. fresh lemon juice
  • 2 Tbs. cold unsalted butter, cut into half-inch pieces
  • 1 egg white, beaten with 1 tsp. water
  • 2 tsp. granulated sugar

Directions

  1. To make the dough, in a food processor, pulse the flour, salt, and granulated sugar together until combined, about 5 pulses.  Add the butter and process until the mixture resembles coarse meal, about 10 pulses.  Add 3 Tbs. of the ice water and pulse 2 or 3 times.  The dough should hold together when squeezed with your fingers but should not be sticky.  If it is crumbly, add more water 1 tsp. at a time, pulsing twice after each addition.  Turn the dough out onto a work surface, divide in half and shape each half into a disk.  Wrap the disks separately in plastic wrap and refrigerate for at least 2 hours or up to overnight.
  2. On a lightly floured work surface, roll out half of the dough into a 12-inch round about 1/8 inch thick.  Fold the dough in half and then into quarters and transfer it to a 9-inch deep-dish pie dish.  Unfold and gently press the dough into the bottom and sides of the dish. Trim the edges flush with the rim of the dish.  Refrigerate for 30 minutes.
  3. On a large sheet of lightly floured parchment paper, roll out the remaining dough disk into a 12-inch round about 1/8 inch thick.  Using a small cookie cutter (I used a heart), make cut outs of the dough and place them on the parchment paper.   Reroll the dough scraps to make more cutouts.  Refrigerate the cutouts for 30 minutes.
  4. Meanwhile, make the filling: In a large Dutch oven, stir together the apples, brown sugar, granulated sugar, cinnamon, salt, nutmeg and cornstarch.  Set over medium heat, cover and cook, stirring occasionally, until the apples are just tender but not mushy, about 20 minutes.  Uncover and cook until the liquid has thickened and become glossy, 5 to 7 minutes more.  Remove from the heat, stir in the lemon juice and let cool to room temperature, about 30 minutes.
  5. Position a rack in the lower third of an oven, place a baking sheet on the rack and preheat the oven to 400°F.
  6. Let the pie shell and heart cutouts stand at room temperature for 5 minutes.  Transfer the apple filling to the pie shell and scatter the butter pieces on top.   Assemble the heart cutouts onto the pie filling, slightly layering them until the entire pie is covered.  Trim the edges flush with the rim of the dish and press the top and bottom crusts together to seal.  Brush the entire top crust with egg wash and sprinkle with the granulated sugar.
  7. Place the pie dish on the preheated baking sheet.  Bake until the crust is crisp and golden brown, about 1 hour, covering the edges with aluminum foil if they become too dark. Transfer the pie to a wire rack and let cool for at least 1 1/2 hours before serving.

Serves: 8

Source: Williams Sonoma

Banana Cake with Chocolate Glaze

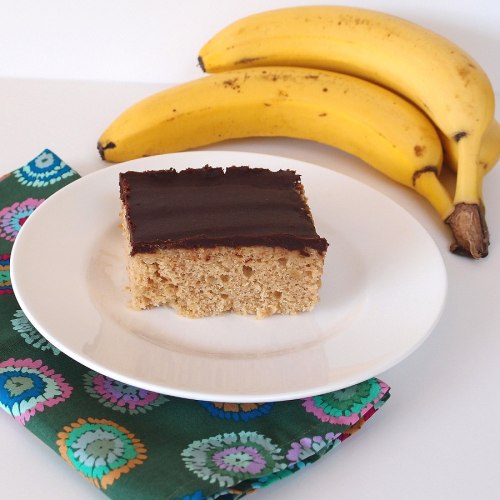
There are lots of different things you can make using overripe bananas.  Some of my favorite breakfast recipes using bananas are green smoothies, fruity smoothies, banana cinnamon muffins, and blueberry banana muffins.  Bananas are also great in desserts too – like in this delicious banana cake with chocolate glaze.  The cake itself tastes very similar to banana bread, but the addition of a silky chocolate glaze makes this cake extra rich and delicious.  This cake is extremely moist, and the chocolate complements the banana flavor very well.  Like most desserts I’ve been making lately, this cake is super easy to make.  The batter takes just a few minutes to mix up, and frosting the cake couldn’t be any easier – you just simply pour the warm chocolate glaze over the top of the cake and it will seep to the sides of the pan, thus covering the whole cake.  I recommend serving this yummy cake with a cold glass of milk.  Enjoy!

Banana Cake with Chocolate Glaze

(print recipe)

Banana Cake

Ingredients

  • 2 ½ cups all-purpose flour
  • 1 tablespoon baking powder
  • ¾ teaspoon cinnamon
  • ½ teaspoon salt
  • ½ cup (1 stick) unsalted butter, room temperature
  • ½ cup white sugar
  • ¾ cup light brown sugar
  • 2 large eggs
  • 3 overripe bananas, mashed
  • 1 teaspoon vanilla extract
  • ¾ cup buttermilk

Directions

  1. Preheat oven to 325 degrees F (160 degrees C). Grease a 9 x 13 inch baking pan.
  2. In a medium bowl, whisk together the flour, baking powder, cinnamon, and salt. Set aside.
  3. In the bowl of a stand mixer, cream together the butter and sugars until light and fluffy. Add the eggs one at a time, beating well after each addition. Mix in the bananas and vanilla extract.
  4. Alternatively add and beat in the flour mixture and buttermilk in 5 additions, starting and ending with the flour. Pour the batter into the prepared baking pan. Bake for 35-40 minutes, or until golden and a toothpick inserted in the center comes out clean. Let the cake cool completely before frosting.

Yield: One 13 x 9 inch cake

Source: slightly adapted from The Pastry Affair

Semisweet Chocolate Glaze

Ingredients

  • 8 oz. semisweet chocolate chips
  • ¼ cup heavy cream
  • 2 tbsp. unsalted butter cut into 4 pieces, at room temperature
  • 2 tbsp. light corn syrup

Directions

  1. Combine the chocolate, cream, butter and corn syrup in a double boiler or heatproof bowl set over simmering water.
  2. Heat until the chocolate has melted, and then whisk the ingredients together until completely smooth.  Pour the glaze over the top of the chilled cake, allowing it to run to the sides of the pan.

Note: The cake should be stored in the refrigerator.  You can serve it cold, or let it come to room temperature for 30-45 minutes before serving.

Source: Cooking with Karen; Originally adapted from Annie’s Eats

One Year Ago: Amaretto Madeleines

Peanut Butter Oatmeal Chocolate Chip Cookies

Now that I’m getting closer to the end of my pregnancy, I haven’t been cooking or baking nearly as much as I used to.  There are two reasons for this.  First, I’ve been spending a lot of my free time preparing for my babies to arrive, and second, I just don’t have the energy to spend hours in my kitchen like I used to.  I used to cook or bake something almost every day, but now it’s more like only once or twice a week.  Lucky for me, I married a man that likes to cook too, so he has been making a lot of our dinners lately.  :)  These days when I do cook, I’ve been choosing simpler, less time consuming recipes, so that I have more time to rest (and tackle my never-ending to-do list!)

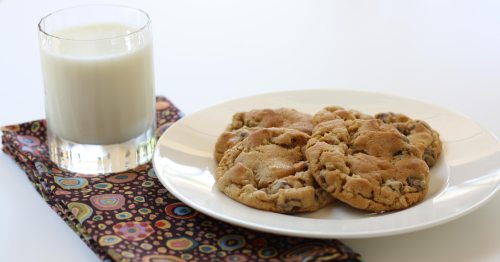
These peanut butter oatmeal chocolate chip cookies are a great example of the type of recipes I have been baking lately.  They take less than 20 minutes to make (plus cooking time).  If you’re fortunate enough to have your sister (or a friend) over to help you like I was, they take even less time!  :)  And all of the ingredients are common pantry items, so no special trip to the grocery store is needed.  These cookies are the perfect thing to make to satisfy your sweet tooth.  They are soft, chewy, and filled with the flavors of chocolate, peanut butter, and oatmeal – a classic and delicious combination.  I’m sure I will be making these cookies again and again!

Peanut Butter Oatmeal Chocolate Chip Cookies

(print recipe)

Ingredients

  • 1 cup all-purpose flour
  • 1 teaspoon baking soda
  • ¼ teaspoon salt
  • ½ cup (1 stick) unsalted butter, at room temperature
  • ½ cup creamy peanut butter
  • ½ cup granulated sugar
  • 1/3 cup light brown sugar
  • ½ teaspoon vanilla extract
  • 1 egg
  • ½ cup rolled oats
  • 1 cup chocolate chips

Directions

  1. Whisk together the flour, baking soda, and salt; set aside.
  2. On medium speed, cream together the butter, peanut butter, granulated sugar, brown sugar and vanilla extract, about 3 minutes.  Add the egg and beat to combine.  On low speed, gradually add the flour until just combined.  Stir in the oats, and then the chocolate chips.
  3. If desired, you may refrigerate the dough for at least 2 hours, but no more than 36 hours.
  4. A few minutes before you are ready to bake the cookies, preheat the oven to 350 degrees F.  Line two baking sheets with parchment paper.
  5. Use a large cookie scoop (3 tablespoons) and drop dough onto prepared baking sheets about 2 inches apart.  Bake for 10-12 minutes, or until the cookies are lightly golden and just set in the center.  Cool completely on the baking sheet and then store in an airtight container at room temperature.

Yield: 16-18 cookies

Source: Kristine’s Kitchen; Originally adapted from Brown Eyed Baker

One Year Ago: Mocha Cupcakes with Espresso Buttercream Frosting

Twix Caramel Brownies

When I first saw the recipe for these Twix Caramel Brownies on the blog ‘Two Peas and Their Pod’, I could not get them out of my mind.  I mean, how can you resist brownies made out of chocolate, caramel, and Twix bars??  I absolutely love the combination of chocolate and caramel, so I knew I would love these brownies.  After a few days went by and I still couldn’t stop thinking about these brownies, I finally decided it was time to give into my craving, so I picked up some Twix bars and caramel sauce at the grocery store, and then got to work in my kitchen.

And all I can say is wow.  These brownies are amazing!  They are definitely some of the best brownies I have ever had.  They are so fudgy, rich, and chocolaty.  And the addition of caramel and Twix bars takes them over the top – I love the extra little bit of crunch and sweetness that the Twix bars impart.  If you are in the mood for a fancier variation of classic brownies, try these Twix caramel brownies!

Twix Caramel Brownies

(print recipe)

Ingredients:

  • 1 cup (2 sticks) butter
  • 2 cups granulated sugar
  • 2 teaspoons vanilla extract
  • 4 large eggs
  • ¾ cup cocoa
  • 1 cup all-purpose flour
  • ½ teaspoon baking powder
  • ¼ teaspoon salt
  • 1 ½ cups chopped Twix candy bars
  • 1/3 cup caramel ice cream topping

Directions:

1. Heat oven to 350°F. Grease a 9 x 13 pan with cooking spray. Set aside.

2. Place butter in a medium saucepan on the stove. Heat over medium heat until the butter is melted. Remove from the heat and stir in sugar and vanilla extract. Add the eggs, one at a time, beating well with spoon after each addition. Add cocoa; stir until well blended. Add flour, baking powder and salt; stir until combined. Stir in Twix candy bar chunks. Pour batter into prepared pan.

3. Drizzle caramel evenly over the brownies. Using a toothpick, swirl caramel into brownies. Bake for 35-40 minutes or until brownies begin to pull away from sides of pan and a toothpick inserted in the middle comes out clean. Cool brownies completely in pan on a wire rack. Once cool, cut into squares and serve.

Yield: 24 brownies

Source: Two Peas and Their Pod

One Year Ago: White Wine Sangria


Chewy Oatmeal Chocolate Chip Cookies

A few days ago I was in the mood for chocolate chip cookies.  Typically when I make chocolate chip cookies I use either Nestle’s Tollhouse chocolate chip cookie recipe or Baking Illustrated’s Thick & Chewy chocolate chip cookie recipe.  I love both of those recipes, but since I’m expecting, I wanted to try a recipe that was a little bit healthier, so I made these oatmeal chocolate chip cookies instead.  In reality, they are probably not that much better for you (cookies are cookies after all!) but the fact that there is quite a bit of oatmeal in them does make me feel better about indulging in them.  :)

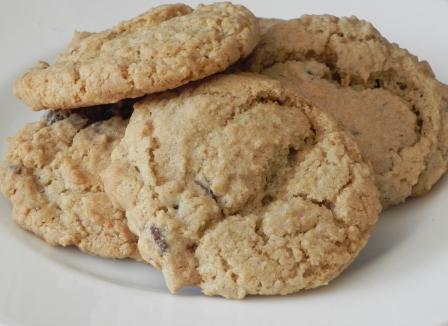
These cookies are so delicious – I love the chewy texture and the oatmeal flavor really comes through in them.  The secret to these cookies is that the oats are finely ground into a powder (instead of being left whole) before they are mixed into the batter.  I really like how the oatmeal powder provides the flavor (and health benefits!) of oats but with a much smoother texture than other oatmeal cookies.  I used semisweet chocolate chips in my cookies, but you could also use dark or milk chocolate, or omit the chocolate altogether and just make plain oatmeal cookies.  I hope you find these cookies as irresistible as I do!

Chewy Oatmeal Chocolate Chip Cookies

(print recipe)

Ingredients

  • 1 cup (2 sticks) unsalted butter
  • 1 cup granulated sugar
  • 1 cup light brown sugar
  • 2 eggs
  • 1 teaspoon vanilla extract
  • 2 ½ cups rolled oats
  • 2 cups all-purpose flour
  • ¾  teaspoon salt
  • 1 teaspoon baking powder (add a pinch more for softer cookies)
  • 1 teaspoon baking soda
  • 12-16 ounces chocolate chips (semisweet, milk, dark chocolate, or a combination – add more or less chocolate depending on your taste)
  • 1 ½ cups chopped nuts (optional)

Directions

  1. Preheat the oven to 350 degrees F and line 1 or 2 baking sheets with parchment paper.
  2. In the bowl of a stand mixer fitted with the paddle attachment, cream the butter and sugars.  Add the eggs and vanilla extract and mix to combine.
  3. After measuring out the rolled oats, place them in a food processor and process them until they turn to powder.
  4. Place all of the dry ingredients (oatmeal powder, flour, salt, baking powder & baking soda) in a separate bowl and whisk to combine.
  5. Add the dry ingredients to the mixer and mix until fully incorporated.  Then add the chocolate and nuts and mix to combine.  Place rounded tablespoon-sized balls of dough on the cookie sheets (a cookie scoop works well for this).
  6. Bake for 10-12 minutes at 350 degrees F.  Cool the cookies on the cookie sheets for 2 minutes and then transfer them to a wire rack to cool completely.

Yield:  Approximately 5 dozen cookies

Source: Adapted from a family friend

One Year Ago: Beach Ball Sugar Cookies

Soft and Chewy Peanut Butter Cookies

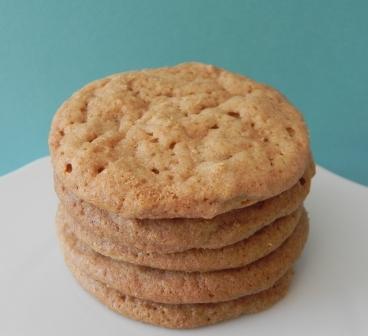
I am happy to report that I have finally found the perfect peanut butter cookie recipe!  Before finding this little gem, I tried a couple of mediocre recipes.  In my opinion, the perfect peanut butter cookie must be soft, chewy, and flavorful.  The other two recipes I tried resulted in crunchy cookies, which is the opposite of what I was hoping for.  After the first two recipes I tried (both from cookbooks that I own) failed to produce a soft and chewy cookie, I turned to the internet to look for a new recipe.  And what better way to find a soft and chewy peanut butter cookie recipe than to Google “Soft & Chewy peanut butter cookies” ?!  Several search results came up, and I came across this one.  With 39 five-star reviews, this Mrs. Field’s recipe sounded promising.

After making these cookies, this recipe certainly wins my seal of approval!  These peanut butter cookies are soft, chewy and perfectly peanut butter flavored.  And they are so easy to make too.  Both of the other recipes I tried required you to roll the cookie dough into balls and then into sugar… which is a lot of extra work if you ask me.  For this recipe, I just used my 1-inch cookie scoop to measure out the dough balls, placed them on the cookie sheet, and baked them- so much easier than having to roll each dough ball into sugar!  The hardest part about making this recipe is that the cookies must bake for 20 minutes, so that means you have to wait 20 minutes to eat one!  :/  But trust me, they are worth the wait.  :)

I love the combination of chocolate and peanut butter, so I added chocolate squares to some of the cookies. To do this, just press a small square of chocolate (I used Hershey’s) into the center of the cookie right after you take the cookies out of the oven. The chocolate will melt into the hot cookie.

Soft & Chewy Peanut Butter Cookies

(print recipe)

Ingredients

  • 2 cups all-purpose flour
  • ½ teaspoon baking soda
  • ¼ teaspoon salt
  • 1 ¼ cups packed dark brown sugar
  • 1 ¼ cups granulated sugar
  • 1 cup butter, softened
  • 3 large eggs
  • 1 cup creamy peanut butter
  • 2 teaspoons vanilla extract

Directions

  1. Preheat oven to 300 degrees F.
  2. Mix dry ingredients (flour, baking soda & salt) together in a small bowl and set aside.
  3. In the bowl of a stand mixer fitted with the paddle attachment, mix the butter, brown sugar and granulated sugar until well combined.  Add the eggs, peanut butter, and vanilla extract; beat until fluffy.  On low speed, add the flour mixture and mix until just mixed into the butter mixture (do not overmix)!
  4. Drop by rounded tablespoonful, 2 inches apart on an ungreased cookie sheet.  Bake until the edges of the cookies are lightly browned, approximately 18-20 minutes.  Remove from the cookie sheets and let cool.

Notes –

  • Do not over bake the cookies or they won’t be soft and chewy.
  • The dough for these cookies is really soft.  I recommend chilling it in the refrigerator for 30-60 minutes before baking the cookies, and it will be much easier to work with!

Yield: 3-4 dozen cookies (depending on size)

Source:  slightly adapted from Food.com

One Year AgoLemony Couscous with Peas and Chicken

S’mores Cake

When I saw this cake featured on Annie’s Eats, I just knew I had to make it ASAP so it went straight to the top of my list of recipes to try.  This cake was truly exceptional.  I expected it to be good and all, but it wasn’t just good; it was really really good.  It’s a two-layer graham cracker flavored cake that is super moist, flavorful, and buttery.  It made my house smell amazing as it was baking in the oven.  It’s the kind of aroma that you just want to bottle up and turn into a scented candle so that you can enjoy it all the time.  Marshmallow fluff is sandwiched between the two cake layers and then the entire cake is covered in a silky milk chocolate glaze.  The top of the cake is garnished with even more marshmallow fluff as well as graham crackers and chocolate bars.  This cake is the perfect thing to make to kick off the summer season!  And it really does taste like a giant s’more.  Try it, you will definitely want to eat s’more of it!  (Sorry, I couldn’t resist! :)  )  Enjoy!

S’mores Cake

(print recipe)

Ingredients

For the cake:

  • 2 cups graham cracker crumbs (to make the crumbs, pulse graham crackers in a food processor until they are finely ground)
  • 2 tsp. baking powder
  • ¼ tsp. salt
  • 3 large eggs, separated
  • 8 tbsp. unsalted butter, at room temperature
  • 1 cup granulated sugar
  • 1 tsp. vanilla extract
  • 1 cup whole milk

For the filling:

  • Marshmallow fluff

For the milk chocolate glaze:

  • 8 oz. milk chocolate chips
  • ¼ cup heavy cream
  • 2 tbsp. unsalted butter cut into 4 pieces, at room temperature
  • 2 tbsp. light corn syrup

For decoration:

  • 3 tbsp. unsalted butter, softened
  • ½ cup marshmallow fluff
  • ¾ cup confectioners’ sugar, sifted
  • 1-2 tsp. milk
  • Small rectangles of graham cracker and milk chocolate, for garnish

Directions

  1. To make the cake, preheat the oven to 375° F.  Line the bottom of two 9-inch round cake pans with parchment paper.  Grease and flour the sides of the pans; set aside.  In a medium bowl, combine the graham cracker crumbs, baking powder and salt; stir together and set aside.
  2. In the bowl of an electric mixer fitted with the whisk attachment, beat the egg whites on medium-high speed until soft peaks form.  Transfer the egg whites to a separate bowl and set aside.  Replace the mixer bowl and fit it with the paddle attachment.  Cream together the butter and sugar and beat on medium speed until light and fluffy, about 2 minutes.  Mix in the egg yolks until well combined.  Stir in the vanilla extract.
  3. Add in the dry ingredients in three additions, alternately with the milk (in 2 additions) on low speed, beginning and ending with the dry ingredients and mixing just until incorporated.  Using a rubber spatula, fold in about a third of the egg whites to lighten the batter.  Gently fold in the remaining egg whites until completely incorporated.
  4. Divide the batter evenly between the prepared cake pans.  Bake the cakes for about 20 minutes or until a toothpick inserted in the center comes out clean.  Allow the cakes to cool in the pans for about 5-10 minutes, then invert onto a wire rack, remove the parchment paper and let cool completely.
  5. Once the cake has cooled completely, transfer one of the cake layers to a foil-covered cardboard cake circle and place on a serving platter.  Carefully spread a layer of marshmallow fluff over the cake.  Top with the remaining cake layer and refrigerate for approximately 1 hour.
  6. To make the milk chocolate glaze, combine the chocolate, cream, butter and corn syrup in a double boiler or heatproof bowl set over simmering water.  Heat until the chocolate has melted, and then whisk the ingredients together until completely smooth.  Pour the glaze over the top of the chilled cake, allowing it to run down the sides of the cake in some places.  Return the cake to the refrigerator to chill until set.
  7. To make the marshmallow frosting for decoration, combine the butter and marshmallow fluff in the bowl of an electric mixer.  Beat on medium speed until smooth.  Beat in the confectioners’ sugar until well combined.  Stir in the milk to smooth the frosting out a bit, adding a tiny bit more liquid if necessary.
  8. Transfer the frosting to a pastry bag fitted with a large round tip.  Pipe dollops of frosting around the edges of the chilled cake and decorate with small rectangles of graham cracker and milk chocolate.  Store the cake in the refrigerator until ready to serve, and allow it to sit at room temperature about 20 minutes before slicing and serving.

Source: slightly adapted from Annie’s Eats; Originally adapted from Baking Bites

Double Chocolate Raspberry Cupcakes

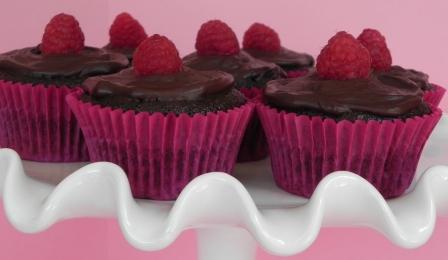
Lately I have been making lots of cupcakes!  They are so much fun to make and the flavor possibilities are endless.  One flavor combination I absolutely love is chocolate and raspberry.  Of all the cupcakes I’ve made recently, I think these double chocolate raspberry cupcakes are my favorite.  (Eric agrees).  These cupcakes are fluffy, moist, light and airy.  And they are super rich because they contain both melted chocolate and cocoa powder, and in addition to that, the chocolate flavor is further enhanced by coffee.  The centers of these cupcakes are injected with a delicious raspberry filling, and the cupcakes are topped with a rich and creamy chocolate ganache.  As a final sweet touch, the cupcakes are garnished with chocolate ganache-filled raspberries (whoever thought of filling raspberries with chocolate is a genius!)  These cupcakes do take some time to make, but the end result is well worth the time and effort.

Double Chocolate Raspberry Cupcakes

(print recipe)

Ingredients

For the cupcakes:

  • 3 oz. semisweet chocolate, finely chopped
  • 1½ cups hot brewed coffee
  • 3 cups sugar
  • 2½ cups all-purpose flour
  • 1½ cups unsweetened cocoa powder
  • 2 tsp. baking soda
  • ¾ tsp. baking powder
  • 1¼ tsp. salt
  • 3 large eggs
  • ¾ cup vegetable oil
  • 1½ cups buttermilk
  • ¾ tsp. vanilla extract

For the filling:

  • 1 (12 oz.) bag frozen raspberries, thawed
  • ¼ cup sugar
  • 1 tbsp. cornstarch

For the frosting:

  • 12 oz. bittersweet or semisweet chocolate, finely chopped
  • ¾ cup heavy cream
  • 1½ tbsp. sugar
  • 1½ tbsp. corn syrup
  • 3 tbsp. unsalted butter, at room temperature

Directions

  1. To make the cupcakes, preheat the oven to 350˚ F.  Line cupcake pans with paper liners.  Place the chopped chocolate in a medium bowl; add the hot coffee and let stand a minute or two, then whisk until the chocolate is melted and the mixture is smooth.
  2. In a large mixing bowl, combine the sugar, flour, cocoa powder, baking soda, baking powder, and salt.  In the bowl of an electric mixer beat the eggs on medium-high speed until slightly thickened and pale yellow.  Slowly add the oil, buttermilk, vanilla, and melted chocolate mixture to the eggs, mixing until well blended.  Add the dry ingredients and beat on medium-low speed just until incorporated.
  3. Divide the batter evenly between the prepared cupcake liners, filling each about ¾ of the way full.  Bake 18-20 minutes or until a toothpick inserted in the center comes out clean.   Allow to cool in the pan 5-10 minutes, then transfer to a wire rack to cool completely.
  4. To make the raspberry filling, puree the raspberries in a blender or food processor.  Strain the mixture through a fine mesh sieve into a saucepan to remove the seeds.  Whisk in the sugar and cornstarch, and heat, stirring frequently until the mixture boils.  Once it has thickened, remove the pan from the heat.  Chill before using.
  5. Meanwhile, make the ganache.  Add the chopped chocolate to a medium heatproof bowl.  In a saucepan combine the cream, corn syrup and sugar.  Heat until just boiling.  Immediately pour the mixture over the chopped chocolate and let stand a few minutes to melt.  Whisk in small circular motions until the mixture is smooth and blended, then whisk in the butter 1 tablespoon at a time until completely incorporated.  Let the mixture stand at room temperature to thicken slightly, so it can be piped or spread.
  6. To assemble the cupcakes, place the raspberry filling in a pastry bag.  (I used a tip specifically for injecting fillings, but a plain tip is fine too.  This cake is soft enough that you can just stick the tip into the top of the cupcake and pipe away.)  Pipe a few teaspoons of filling into each cupcake.  Spread the ganache over the tops of the cupcakes.  If desired, pipe excess ganache inside fresh raspberries and place on top of the frosted cupcakes (be sure to do this before the frosting sets.)  Allow to set completely before serving.

Note: These cupcakes should be stored in the refrigerator.  Let them come to room temperature for about 45 minutes before serving.

Yield: 24-28 cupcakes

Source: Annie’s Eats; originally adapted from Smitten Kitchen and Gourmet, March 1999

Vanilla Cupcakes with Chocolate Buttercream Frosting

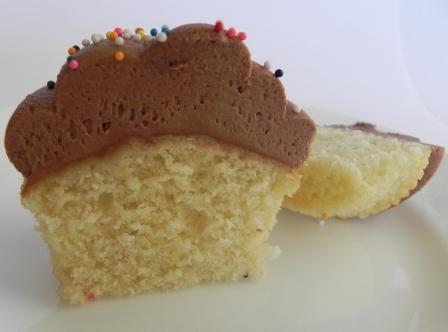
I picked this cupcake recipe out of the Magnolia Bakery cookbook, and I wasn’t sure what to expect from it.  I expected them to taste good, but I wasn’t expecting too much because these vanilla cupcakes have such basic, simple ingredients… nothing fancy like fresh vanilla beans or cake flour.  As it turns out, you don’t need all the bells and whistles (i.e. expensive ingredients) to make a delicious vanilla cupcake with chocolate frosting.  I’m slightly ashamed to say this, but between the two of us, Eric and I ate all 12 of these cupcakes in just a 3-day period.  I usually have much more self control than that! :)  They really were that good though.  The vanilla cake is fluffy, moist, and has just the right amount of vanilla flavor.  And the frosting is incredible – it’s creamy, chocolaty, fluffy, sweet and rich.  It’s the perfect accompaniment to the vanilla cupcakes.  I can’t wait to make these cupcakes again!

A few notes:

  • This cupcake recipe calls for self-rising flour.  Self-rising flour is flour that contains pre-mixed leavening agents.  You can purchase it from the grocery store, but it is super easy (and probably cheaper) to make at home.  A recipe for self-rising flour is included at the bottom of this post.
  • I used a large round tip to frost the cupcakes.
  • I always store leftover cupcakes in the refrigerator.  Before serving them, let them come to room temperature for 30-45 minutes.

Vanilla Cupcakes

(print recipe)

Ingredients

  • 1 ½ cups self-rising flour  (see below for recipe)
  • 1 ¼ cups all-purpose flour
  • 1 cup (2 sticks) unsalted butter, softened
  • 2 cups granulated sugar
  • 4 large eggs, at room temperature (I used eggs straight from the fridge)
  • 1 cup whole milk
  • 1 teaspoon vanilla extract

Directions

  1. Preheat oven to 350 degrees.  Line 24 muffin tins with cupcake papers.
  2. In a small bowl, combine the self rising flour and all-purpose flour; set aside.
  3. In the bowl of a stand mixer fitted with the paddle attachment, cream the butter on medium speed until smooth.
  4. Add the sugar gradually and beat for 3 minutes or until fluffy.
  5. Add the eggs, one at a time, beating well after each addition.
  6. Add the dry ingredients in three parts, alternating with the milk and vanilla.
  7. With each addition, beat until the ingredients are incorporated, but do not overbeat.  Using a rubber spatula, scrape down the batter in the bowl to make sure the ingredients are well blended.
  8. Spoon the batter into the cupcake liners, filling about 3/4 full.
  9. Bake in a 350° oven for 20-25 minutes (a toothpick inserted in the center should come out clean).
  10. Cool the cupcakes in the muffin tin for 15 minutes.  Remove from the tins and cool completely on a wire rack before icing.

Yield: 24 cupcakes (recipe can be halved)

Source: Adapted from The Complete Magnolia Bakery Cookbook

Chocolate Buttercream Frosting

Ingredients

  • 1 ½ cups (3 sticks) unsalted butter, softened
  • 2 tablespoons whole milk
  • 9 ounces semisweet chocolate, melted and cooled to lukewarm **
  • 1 teaspoon vanilla extract
  • 2 ¼ cups sifted powdered (confectioners’) sugar

Directions

**Note: There are 2 ways you can melt the chocolate:

  • Place in a double boiler over simmering water on low heat for 5-10 minutes; stirring occasionally until the chocolate is completely smooth and no pieces remain; remove from heat and let cool 5-15 minutes or until lukewarm.
  • Or you can just melt the chocolate  in the microwave.  To do this, place the chopped chocolate in a microwave safe bowl and microwave for about 30 seconds.  Then stir the chocolate and continue microwaving in 5-10 second intervals until the chocolate is fully melted.
  1. To make the buttercream: In a large mixing bowl, beat the butter using an electric mixer on MEDIUM speed for about 3 minutes or until creamy.
  2. Add the milk carefully and beat until smooth.
  3. Add the melted chocolate and beat well for 2 minutes.
  4. Add the vanilla and beat for 3 minutes.
  5. Gradually add in the sugar and beat on LOW speed until creamy and of desired consistency.

Yield: Enough frosting to frost 24 cupcakes or a 9-inch two layer cake.

**For icing a 3-layer cake use the following measurements: 2 cups unsalted butter, 3 tablespoons milk, 12 ounces semisweet chocolate, 1 1/2 teaspoons vanilla extract, 3 cups sifted powdered sugar.

Source:  The Complete Magnolia Bakery Cookbook

Self Rising Flour

Ingredients

  • 1 ½  cups all-purpose flour
  • ¾ teaspoon salt
  • 2 ¼ teaspoons baking powder

Directions – Sift together the flour, salt, and baking powder.

Yield: 1 ½ cups of self-rising flour

Source:  All Recipes

Coffee ‘n’ Cream Brownies

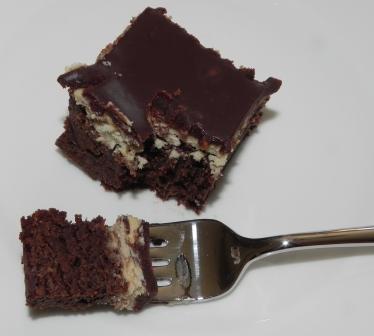
This recipe for Coffee and Cream brownies comes from the cookbook ‘Taste of Home Cookies’, which I picked up on sale at Costco a few years ago.  This book has tons of recipes for cookies and cookie-type desserts in it, including these delicious brownies.  These 3-layer brownies are comprised of a brownie layer, topped with an espresso buttercream layer, followed by a layer of chocolate ganache.  The espresso layer tastes very similar to my favorite mocha buttercream frosting.  You really cannot go wrong when you top brownies with frosting and chocolate ganache!  These brownies are so rich and chocolaty.  I love the creamy topping on the chewy brownie base.  They are the perfect thing to bake to satisfy any chocolate craving!

Coffee ‘n’ Cream Brownies

(print recipe)

Ingredients:

For the Brownie Layer:

  • ½ cup butter, cubed
  • 3 ounces unsweetened chocolate, chopped
  • 2 eggs
  • 1 cup granulated sugar
  • 1 teaspoon vanilla extract
  • 2/3 cup all-purpose flour
  • ¼ teaspoon baking soda

For the Espresso Buttercream Layer:

  • 4 tablespoons heavy whipping cream
  • 1 ½ teaspoons instant espresso powder
  • 3 tablespoons butter, softened
  • 1 ½ cups confectioners’ sugar

For the Chocolate Ganache Layer:

  • 1 cup (6 ounces) semisweet chocolate chips
  • 1/3 cup heavy whipping cream

Directions:

  1. In a microwave, melt the butter and chocolate; stir until smooth.  Cool slightly.  In a small bowl, whisk together the eggs, sugar and vanilla; then stir in the chocolate mixture.  In a separate small bowl, combine the flour and baking soda.  Gradually add the flour/baking soda mixture to the chocolate mixture and stir until fully incorporated.
  2. Spread the brownie batter into a greased 8-in. square baking dish.  Bake at 350° for 25-30 minutes or until a toothpick inserted near the center comes out clean (do not overbake).  Cool on a wire rack.
  3. To make the espresso buttercream filling:  Combine the cream and espresso powder in a small bowl; stir until the espresso powder is dissolved.  Using a mixer (my hand held mixer worked well for this), cream the butter and confectioners’ sugar together until light and fluffy.  Beat in the coffee mixture until light and fluffy, and then spread the filling over the cooled brownies.  Place the brownies in the refrigerator while you make the chocolate ganache layer.
  4. To make the chocolate ganache layer:  In a small saucepan, combine the chocolate chips and heavy whipping cream.  Cook and stir over low heat until the chocolate is melted and the mixture is thickened.  Cool slightly.  Carefully spread over the buttercream filling (I just poured the ganache over the filling and then gently tilted the pan from side to side until it had completely spread to cover the filling).  Place the brownies in the refrigerator for 30 minutes or until the glaze is set.  Cut into squares and serve.  Store the brownies in the refrigerator. 

Source: Adapted from Taste of Home Cookies


Enter your email address to subscribe to this blog and receive notifications of new posts by email.

Join 75 other subscribers